Keyclock集成-OAuth2和OpenID与Swagger UI
1.概述
在本教程中,我们将重点介绍如何测试一个安全的REST服务,并使用Keyclock通过Swagger UI进行身份验证和授权。
2.挑战
与其他web资源一样,RESTAPI通常是安全的。因此,服务使用者(例如Swagger UI)不仅需要处理HTTP调用本身,还需要向服务提供者提供身份验证信息。
Keycoat是一个IAM服务器,它允许在服务提供商实现之外进行身份验证和授权。它是体系结构的一部分,如下图所示:
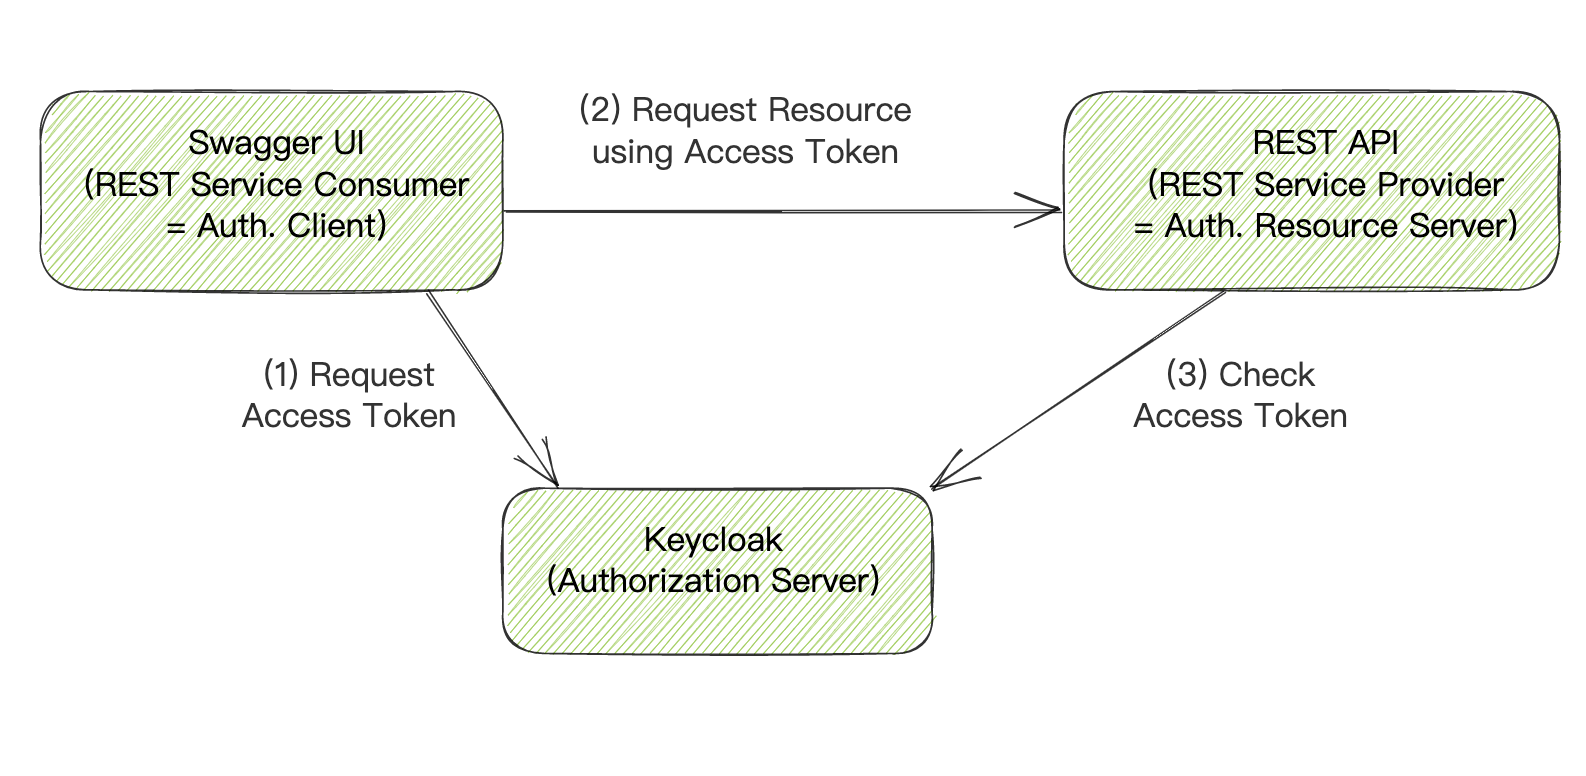
如我们所见,服务提供者和服务使用者都需要联系Keycoat服务器。首先,我们需要安装 Keycoat服务器并将其集成到Spring Boot中 应用程序作为REST服务提供商。然后,我们需要扩展Swagger UI。
3.自定义Swagger UI
我们可以通过在HTML中包含像这样的脚本来直接扩展Swagger UI:
<script src="keycloak/keycloak.js"></script>
<script>
  var keycloak = Keycloak('keycloak.json');
    keycloak.init({ onLoad: 'login-required' })
      .success(function (authenticated) {
        console.log('Login Successful');
        window.authorizations.add("oauth2", new ApiKeyAuthorization("Authorization", "Bearer " + keycloak.token, "header"));
      }).error(function () {
        console.error('Login Failed');
        window.location.reload();
      }
    );
 </script>
该脚本可作为 NPM包,因此可以分叉 Swagger UI源代码库 并通过相应的依赖关系扩展项目。
4.使用标准
只有在非常特殊的情况下,通过特定于供应商的代码扩展Swagger UI才是明智的。所以 我们应该倾向于使用独立于供应商的标准。以下部分将描述如何实现这一点。
4.1.现有标准
首先,我们需要知道存在哪些标准。对于身份验证和授权,有如下协议 Oauth2。对于SSO,我们可以使用 OpenID连接 (OCT) 扩展到OAuth2.
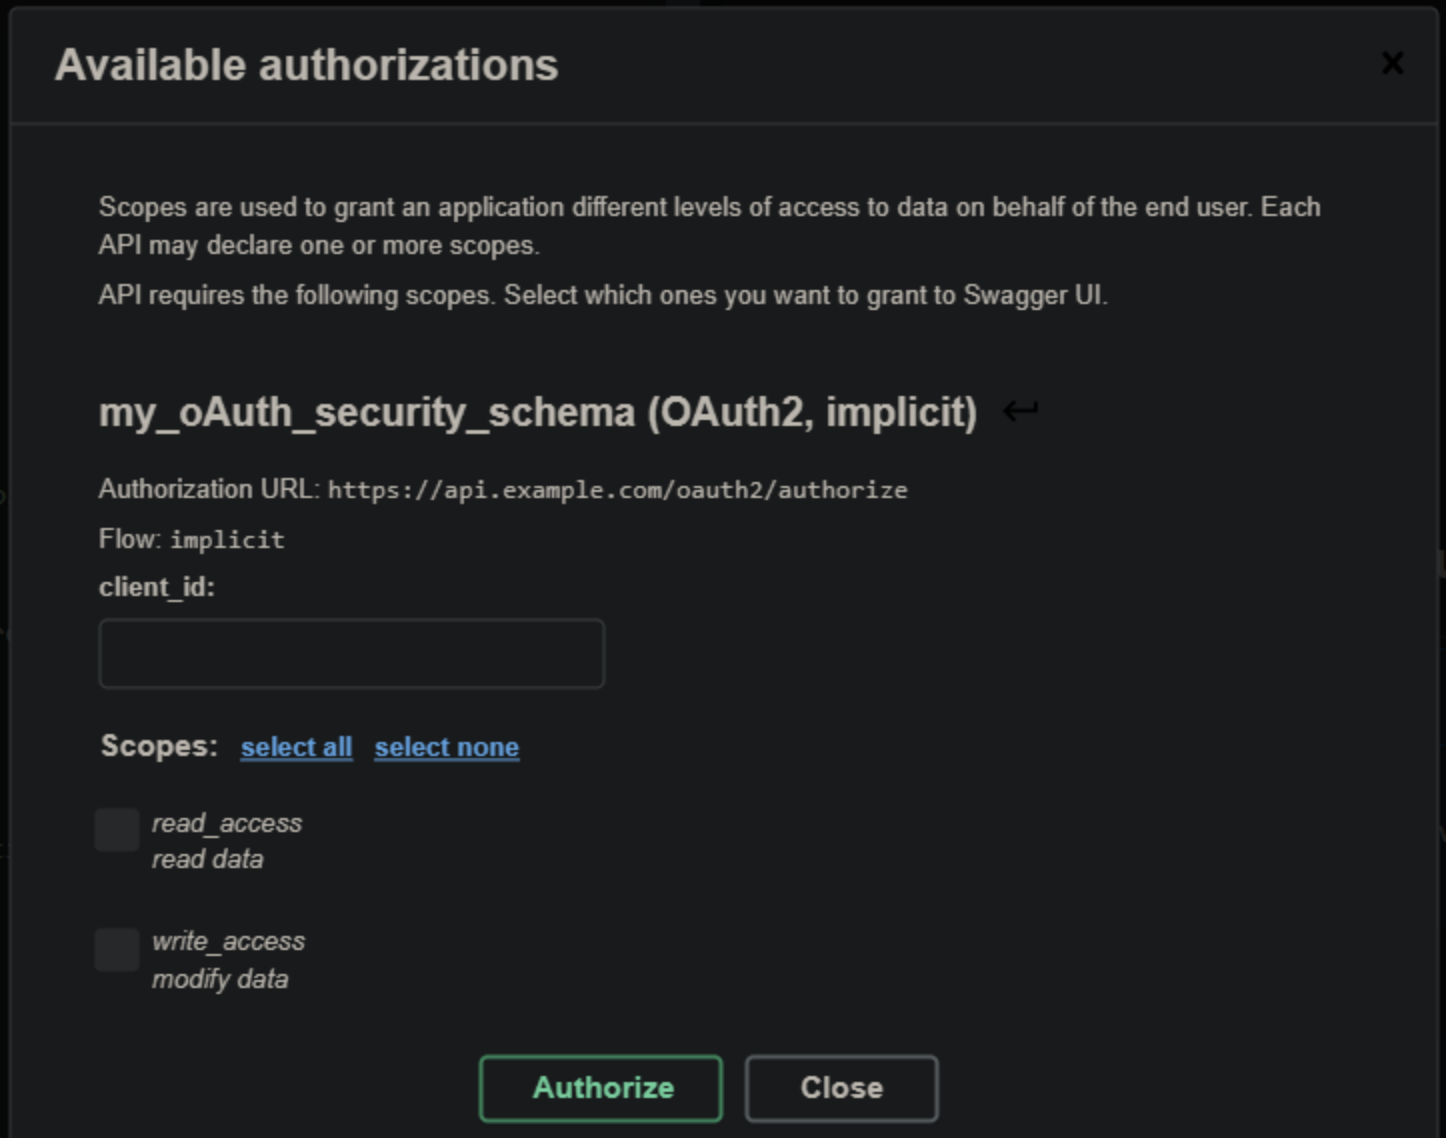
描述REST API的标准是 OpenAPI, 本标准包括定义多个 安全方案,包括OAuth2和OIDC:
paths:
  /api/v1/products:
    get:
      ...
      security:
        - my_oAuth_security_schema:
          - read_access
...
securitySchemes:
  my_oAuth_security_schema:
    type: oauth2
    flows:
      implicit:
        authorizationUrl: https://api.example.com/oauth2/authorize
        scopes:
          read_access: read data
          write_access: modify data
4.2.扩展服务提供商
在代码优先的方法中,服务提供商可以基于代码生成OpenAPI文档。因此,安全方案也必须以这种方式提供。例如,对于包括SpringFox的SpringBoot,我们可以编写这样一个配置类:
@Configuration
public class OpenAPISecurityConfig {

    @Autowired
    void addSecurity(Docket docket) {
        docket
          .securitySchemes(of(authenticationScheme()))
          .securityContexts(of(securityContext()));
    }

    private SecurityScheme authenticationScheme() {
        return new OAuth2SchemeBuilder("implicit")
          .name("my_oAuth_security_schema")
          .authorizationUrl("https://api.example.com/oauth2/authorize")
          .scopes(authorizationScopes())
          .build();
    }

    private List<AuthorizationScope> authorizationScopes() {
        return Arrays.asList(
          new AuthorizationScope("read_access", "read data"),
          new AuthorizationScope("write_access", "modify data")
        );
    }

    private SecurityContext securityContext() {
        return SecurityContext.builder()
          .securityReferences(readAccessAuth())
          .operationSelector(operationContext ->
            HttpMethod.GET.equals(operationContext.httpMethod())
          )
          .build();
    }

    private List<SecurityReference> readAccessAuth() {
        AuthorizationScope[] authorizationScopes = new AuthorizationScope[] { authorizationScopes().get(0) };
        return of(new SecurityReference("my_oAuth_security_schema", authorizationScopes));
    }

}
当然,使用其他技术将导致不同的实现。但我们应该始终了解必须生成的OpenAPI。
4.3.扩展服务消费者
Swagger UI默认支持OpenAPI身份验证方案,无需自定义。我们将有可能进行身份验证:
其他客户会有不同的解决方案。例如,有一个 NPM模块 用于以简单方式提供OAuth2和OpenID Connect(OIDC)的Angular应用程序。
4.4.交换UI限制
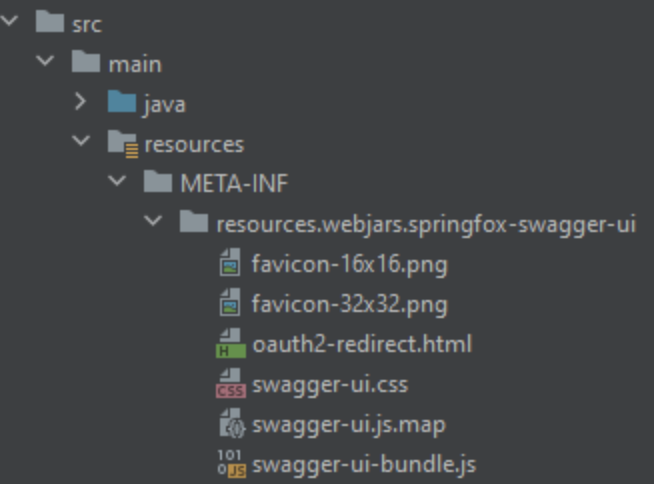
Swagger UI自3.38.0版起支持OpenID Connect Discovery(自3.14.8版起支持Swagger Editor)。不幸的是,SpringFox在当前版本3.0.0中封装了Swagger UI 3.26.2, 如果我们想包含一个较新版本的Swagger UI,我们需要将其直接包含在应用程序中 使用与SpringFox相同的目录结构覆盖SpringFox打包文件:
SpringDoc 1.6.1版本 而是不打包Swagger UI,而是声明对 Swager UI 4.1.3,所以我们不会对SpringDoc有任何麻烦。
5.结论
在本文中,我们指出了在使用Keycoat作为IAM的情况下使用Swagger UI测试REST服务的可能性。最好的解决方案是使用OpenAPI、OAuth2和OpenID Connect等标准,这些工具都支持这些标准。
一如既往,所有代码都可用在GitHub上.
- 本文标签: Security Keycloak Swagger
- 本文链接: https://www.v8en.com/article/285
- 版权声明: 本文由SIMON原创发布,转载请遵循《署名-非商业性使用-相同方式共享 4.0 国际 (CC BY-NC-SA 4.0)》许可协议授权